Digital Timelines
| by Danielle Picard and Derek Bruff | Print Version |
| Cite this guide: Picard, D., & Bruff, D. (2016). Digital Timelines. Vanderbilt University Center for Teaching. Retrieved [todaysdate] from https://cft.vanderbilt.edu/guides-sub-pages/digital-timelines/. |
 Remember those timelines you saw in your history textbook back in middle school? Today’s digital timelines do far more than present a static, linear progression of dates and names. Online, interactive timelines support visually rich displays of information—text, images, multimedia, hyperlinks, even geospatial data—using spatial arrangements, categories, and color schemes to convey meaning, which make them ideal platforms for achieving a variety of course goals and objectives. Traditionally, timelines were considered useful for only certain types of time scales, but the interactivity of online timelines allows time-scales to vary substantially — from a single day to decades, a person’s life, or even non-traditional scales like page numbers in a novel. And, thanks to tools like Tiki-Toki and TimelineJS, you and your students can produce your own online, interactive timelines with relative ease, even collaborating on a single, shared timeline.
Why Use a Timelines-Based Assignment? | Types and Examples of Timeline Assignments | Grading | Other Questions to Consider | Deciding on a Timelines Tool or Platform | Outside the Box: Innovative Use of Timelines | Additional Resources
Why Use a Timelines-Based Assignment?
Timeline-based assignments can aid in a variety of learning goals, including:
- Analyze non-linear relationships. Students often view history as distinctly linear: Event A happened, then Event B, then Event C. A linear view can make it challenging for students to identify relationships among events. By using spatial arrangements, categories, and color schemes to convey meaning, timelines can help students identify these complex relationships.
- Develop historical context. Students sometimes have trouble seeing a particular text or invention or event in its historical context. By visually co-locating events that occurred concurrently in time, timelines can help students contextualize individual events, people, and inventions in relationship with others.
- Analyze on a micro-, macro-, or mega- scale. Students sometimes view historical events on only one scale. In using a timeline, students can identify and analyze how seemingly isolated events relate to larger scale history or other micro-macro dynamics, such as local or regional histories in the context of broader national or worldwide events.
- Focus on details. Large trends have little details that need to be examined. Use timelines to help your students discover how little details relate to the larger picture.
- Develop arguments. Have students select several items from their timeline to develop an argument about change and/or continuity over time.
- Compare time periods. Have students examine themes and concepts across two different time periods. An example used in a Religions of Japan course can be found below in the “Timeline as Analysis” section.
- Document work through proper citations. Timelines are not just a product in themselves; they can also be a tool to help students learn essential research skills like citations of source material for individual entries.
- Understand the development of scholarly discourse or historiography. Undergraduates can be unfamiliar with the idea of academic disciplines as culturally constructed and interpretive. By allowing students to use a timeline to plot the development of scholarly discourse, they can discover how scholars’ understandings of a key figure or subject changes over time.
- Create a visual literature review. Much like understanding the development of scholarly discourse, timelines can also allow students to create a visual literature review, with an emphasis on development over time.
- Visualize change (and continuity) over time and space. Timelines might consider spatial arrangements, as well as temporal ones. A number of tools support mapping both time and space on a common visualization, including TimeMapper, Mapbox, Neatline, StoryMap JS, and American Panorama.
As of this writing (June 2016), there hasn’t been any significant scholarship on teaching with online, interactive timelines — yet. We encourage you to explore ways to not only use timelines in your classroom but write about it too!
Types and Examples of Timeline Assignments
Timelines can serve many different purposes in a class, and may even take on multiple purposes. Here are some examples of timeline assignments:
Timeline as Archive
Ask students to research, select, and annotate timeline entries for the curation of a digital timeline of events and artifacts. This kind of archival work requires a number of valuable skills—finding and evaluating sources, curating for relevance and interest, tagging by category or theme, citing and linking appropriately.
Examples:
Cryptography: Timelines in a Math Course
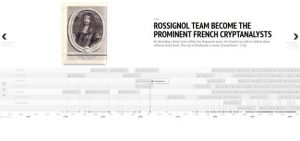 Dr. Derek Bruff, CFT Director and Senior Lecturer in the Department of Mathematics, has had his Cryptography First Year Seminar courses create timelines on cryptography in two different semesters: 2010 version and 2015 version. He has blogged about his experiences, including changes he’s made over time, student feedback, and the limitations of certain tools — all of which you can read about here.
Type: Collaborative class timeline using TimelineJS (2015 version) and the SIMILE project’s Exhibit and Timeline scripts (2010 version) (all students contributed to the same timeline)
Course: Cryptography first year seminar, which focuses on both the mathematics and history of cryptography
2010 Assignment: Students contributed entries to a Google spreadsheet, which dynamically populated a timeline. Bruff considers the experiment a “moderate success” — he ended up with 121 entries in 7 different categories (such as ciphers, culture, people, unsolved, etc.), and some of his students reported the timeline as helpful in seeing connections among course material. He explains more about the project on his blog.
2015 Assignment: Bruff wanted his students to analyze the timeline more this semester. To do that, he asked his students to do two things: 1) select contributions from the 2010 timeline and improve them by verifying the description, including a credible source with citation and, where available, a link, and making sure there’s an associated image or other type of media with citation; and 2) add new contributions. At the end of the semester, students wrote papers that identified “lessons learned” from the history of cryptography for those interested in keeping secrets. The final student papers were strong, and students reported finding it useful to see new examples they had not discussed in class.
Interesting notes: Bruff credits the following people for his interest in digital timelines: “I first heard about digital timeline tools from Jason B. Jones, who had his students build a Victorian Age timeline back in 2008 using Google spreadsheets and the Timeline script from MIT’s SIMILE project. Jason worked with Brian Croxall on the project, and Brian put together a helpful tutorial for others interested in building collaborative timelines.”
Modern South Asia: A Timeline to Accompany HIST 1160
Dr. Samira Sheikh, Associate Professor of History and Associate Professor of Asian Studies Program, created a collaborative timeline with her students in a course on modern South Asia using Tiki-Toki.
Travel Log: Voyages of the British ship the Clarence (1858-1873)
Ian Petrie, Associate Director of University of Pennsylvania’s Center for Teaching and Learning, plotted the voyages of the British ship the Clarence (1858-73) with his Voyages of Discovery first year seminar. Petrie’s students use multiple tools to chart the voyage including StoryMapJS and a torque map made using CartoDB.
Timeline for Analysis
Students can use timelines to conduct various types of analysis. This type of timeline requires that a timeline have a sufficient number of entries, either created by current or past students.
- Ask students to identify patterns and themes among entries in a timeline.
- Ask students to make comparison across different time periods in order to identify aspect of continuity and change.
- Ask students to contextualize an entry by relating it to concurrent entries in order to develop historical perspective taking, understand ethical dimensions of history, and/or analyze causes and consequences. For example, you may ask students to consider a particular text written at a particular time. What political, religious, and artistic debates of that time might have influenced the writing of the text?
- Ask students to evaluate the effectiveness of a law or policy by plotting the chronology of its development and subsequent trials and/or controversies
Examples:
Love and Marriage Timeline in a Women and Gender Studies First Year Seminar
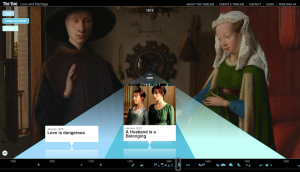 Dr. Elizabeth Meadows, Assistant Director of Vanderbilt’s Curb Center for Art, Enterprise and Public Policy and Senior Lecturer in English, used a collaborative digital timeline project in her Women and Gender Studies First Year Seminar.
- Type: Collaborative class timeline using Tiki-Toki (all students contributed to the same timeline)
- Project: The class created a history of marriage in Great Britain and the US from 1500 to 2014.
- Meadows wanted to trace “the shifting meanings and cultural functions of love and marriage through an archive of legal, religious, and cultural texts.” During the course of the semester, they added texts that served as commentaries on marriage. As a final project, they wrote individual papers connecting recent judicial rulings on same-sex marriage to entries on the shared timeline.
- Grading: Students were graded on selected timeline entries, and they wrote a final paper that used elements of the timeline as evidence. The final project, which required the students to concur or dissent from recent judicial rulings on same-sex marriage using elements from the timeline, was graded based on the quality of the student’s analysis.
- Privacy: Meadows chose to have the timeline be publicly available to help develop her students’ sense of ownership of the project. She allowed the students the option to post under their name or under a pseudonym for privacy purposes.
- Interesting notes: Meadows found the final papers “enjoyable to read” and the students were proud of what they produced. From an instructor’s point of view, the Tiki-Toki platform was simple for her and the students to use and allowed for immediate course corrections when things went awry (such as when students needed to be reminded to use the publication date of a piece, not the date the anthology was published).
Religions of Japan Timeline: Thinking Thematically, Thinking Historically
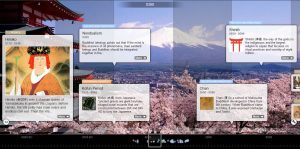 Dr. Bryan Lowe, Assistant Professor in the Department of Religious Studies and Asian Studies Program, asked students to create individual timelines using Tiki-Toki in his Religions of Japan course, which explored the history of Japanese religions from early myths to present-day practices.
- Course: Religions of Japan (approximately 30 students)
- Type: Individual student timelines using Tiki-Tiki (each student created their own timeline)
- Project: Lowe’s course was a thematically-oriented course covering approximately 2,000 years. One of his main methodological goals was for students to recognize that religious traditions do not exist in a vacuum and instead must be studied within their context. This project asked students to make a multimedia (image and text) timeline on Tiki-Toki of four entries per week based on readings and lectures over the course of the semester. The students wrote papers based on their timelines, gave presentations, and used them as a study guide.
- Learning Goals:
- Students will be able to uncover patterns obscured by standard narratives in the historiography.
- Students will be able to relate materials across weeks in the course by thinking about them synchronically (alongside other events from the same time period) and diachronically (within historical trajectories).
- Students will develop a note-taking system for organizing the materials studied in the course. The timeline will act as a resource for study and help students synthesize information.
- Students will practice writing regularly with low stakes writing assignments.
- Grading: The timeline project constituted 50% of a student’s grade, and was divided into three inter-related activities, including the timeline itself (25% of final grade), an in-class presentation (5%), and a final analytical paper (20%).
- Timeline – 25 points total (15 points x 1 point per week and 10 points on overall quality of timeline): Students were required to write four timeline entries per week for weeks two through fourteen. On week 15, students were expected to edit and polish timeline entries for grading. Simply completing these activities will give you full credit for 15 points. Quality points were assigned based on the following criteria: number of entries (at least 60 total for full credit), accuracy, depth (minimum of three substantial sentences), use of media (when appropriate), quality of writing, and citations.
- In-Class Presentation – 5 points total: Starting in week three, students delivered short presentations (3-5 minutes) where they summarized some of their new entries for that week, explained any patterns that they saw, and posed a discussion question.
- Analytical Paper – 20 points total: Lowe gave students the option to answer one of four prompts. Students were required to use at least one primary and one secondary source and engage materials from multiple weeks of the syllabus. Additionally, they were required to include a one-paragraph post-script (not counted in the 4-5 page total) that explains how the timeline helped with the assignment.
- Role of instructor and teaching assistant: Lowe designed the project and periodically checked the timelines to get a general sense of students’ posts. The TA provided the students with written feedback twice a semester and gave final grades on the timelines. Lowe graded the final papers that came out of the timeline. Lowe and his TA divided grading and feedback responsibilities for the in-class presentations.
- Interesting notes: Lowe plans to revise the presentation component of his assignment because the presentations at the beginning of the semester had too few entries to be productive. He reflected, “I plan to revise this part of the assignment to have two whole class periods dedicated to student presentations at 1/3 and 2/3 of the way through the class. I will ask students to use their presentations to tell a story with a narrative based on their timeline. Many of the presentations devolved into simply sharing a few entries with no effort to connect them into a coherent story.”
Timeline as Argument
The selection and presentation of entries in a timeline can be used to support an argument. This type of assignment is best suited for individual or group projects where students add a series of entries to a timeline to support the argument they want to make — usually to a instructor-supplied prompt.
Example:
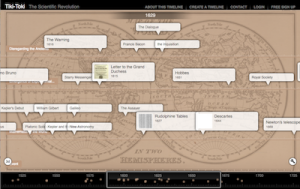 Dr. Ole Molvig, Assistant Professor of History and Physics and Assistant Director Vanderbilt Institute for Digital Learning, had students create individual timelines to argue for or against the use of “revolution” as a valid metaphor for scientific progress in his Scientific Revolutions course.
- Course: Scientific Revolutions
- Type: Individual student timelines using Tiki-Toki
- Project: HIST 1510 The Scientific Revolution is a course where lecture material is presented thematically, rather than chronologically. This timeline assignment was an opportunity for students to re-organize the course material chronologically. Students were asked to evaluate the concept of “the scientific revolution” through this timeline, and alongside a short written explanation, they were asked to make an argument. The display of names, events, and dates is not an objective representation, but rather an argument weighing relative importance. The project was the combination of a timeline and an accompanying essay.
- Grading: Students were graded on a final paper that used elements of the timeline as evidence for their argument.
- Privacy: Dr. Molvig allowed the students to choose how to self-identify online; some students chose to use a pseudonym for privacy purposes.
Timeline for Student-Created Content
While the other examples listed here ask students to use external and existing sources, timeline tools can also accommodate student-created content. With this type of timeline, you can ask students to use a timeline to plan a trip to Mars, hypothesize about the coming Singularity, create a travel-log, or map out an autobiography. Spatial elements may be a critical component to some of these timelines.
Example:
Timeline as Travel Itinerary
 Ask students to create a travel itinerary with dates, times, and places. This can be done using a travel-log of a historical figure, based on a fictional book, or created by a student to visit a new place.
For example, in a foreign language classroom, have students develop timelines to plan an itinerary for visiting a new place that they can describe in the target language. During an in-class presentation, the student can describe places to visit using the target language. This type of project can be connected to other work students do in the course, such as verb tenses, target vocabulary, and presentation skills. For instance, in a section on using future tenses, students can describe they places they will visit during an upcoming trip. Additionally, you can also have students create contingency plans (in case of rain or other delays), which would require students to use conditional or subjunctive tenses as well as weather-related vocabulary.
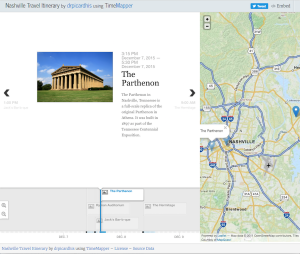
See http://timemapper.okfnlabs.org/drpicardhis/nashville-travel-itinerary for an example of a timeline of places to visit in Nashville near Vanderbilt created by Danielle Picard, Senior Graduate Teaching Fellow and PhD Candidate in History.
Grading
There are a few strategies you can use to make grading timeline assignments easier:
- Light grading vs. evaluative grading. You might grade timeline entries submitted by students only lightly, checking that certain components (title, description, image, citation, and so on) are included. Or you might assess the quality of timeline entries more rigorously, perhaps using an analytic rubric to differentiate among poor, acceptable, good, and excellent quality work in each component.
- Grading all entries vs. grading a selection. You might not grade all entries a student submits to a timeline. You could ask the student to select a set of 3-5 representative entries, or you could select 3-5 entries to grade at random.
- Grading the timeline vs. grading work based on the timeline. If you ask students to create a final paper or project based on their timelines, you might grade that final project instead of grading the timeline directly. If you do, it can be helpful to ask students to include a note with their final project explaining how they used the timeline. These notes can help you understand decisions students made not evidence in their final projects.
Regardless of the strategy you choose, you’ll also want to:
- Discuss timeline entries with your students and establish criteria for what makes for a “good” entry. Consider developing a few “model” entries for your students and/or highlighting particularly good entries during class.
- Provide feedback to students about their timelines or entries early in the course. This feedback can take the form of actual grades or could be comments. Some timelines (like Tiki-Toki) allow you and other students to leave positive/negative comments on entries that indicate questions or concerns you may have.
Other Questions to Consider
How do I incorporate the timeline into class time?
Some suggestions include:
- Display the timeline on the projector during class, and refer to entries as you lecture. Particularly if you noted common themes arising in your students’ entries.
- Encourage students to be creative and include pictures, video, music or other media that relates to the topic in their entries. You can then display or play clips in class.
- Share a few example entries with the entire class and discuss what makes them “good” entries. There’s also value in having students revise entries during class, perhaps working in groups, or contributing their first entries to a shared timeline during class, when you can troubleshoot.
- Ask students to present elements of their timelines to the class. They can describe the trends they see in their entries, provide some ideas of the analysis they may do in their final paper, or perform some other presentation reflective of the goals you have for the course.
Should students work collaboratively on a single class timeline or on individual timelines?
Working collaboratively or independently on a timeline depends on your goals for the assignment. For instance, you may want your students to learn from their peers and construct a timeline that everyone can use (like the example of Dr. Elizabeth Meadows’ Love and Marriage timeline, above). Alternatively, you may want student to construct individual timelines for use in collecting sources and entries for their self-designed research projects (like the example of Dr. Ole Molvig in his Scientific Revolutions course, above).
How private or public should my timeline be?
Issues around privacy, intellectual property, and audience will need to be considered when having students create or contribute to timelines. You’ll need to decide if the timelines should be limited to only the students in your class or be made public. Sometimes making a timeline public helps to raise the stakes for the students, knowing that anyone could read their work. On the other hand, students may be uncomfortable leaving their name attached to an online work for posterity. You’ll have to weigh these benefits and drawbacks when deciding to make student-generated timelines public or private. For instance, timelines on controversial topics created by first-year undergraduates might need to be private, whereas timelines created by seniors intended to be used by a specific audience (say, high school teachers) should be public.
You will also want to verify your university’s policy regarding online work, and in the United States, their guidelines for adhering to the Family Educational Rights and Privacy Act (FERPA). See here for Vanderbilt’s FERPA resources. The following guidelines, provided by the Vanderbilt Institute for Digital Learning, may be helpful:
- Make participation requirements in online assignments very clear in the syllabus at the start of term. Not only will this set participation policies, it allows students to choose to enroll or unenroll in course with full knowledge of course requirements. You may take their continued enrollment as consent regarding your policies.
- Encourage students to manage their own privacy settings. Giving students the choice of when to use an “alias” and when to publish under their given name not only gives them control of their personal information, it provides an exercise in digital citizenship and literacy.
- If full participation under a given name is a necessary component of the assignment, have students sign this consent form. Using this consent form isn’t required (see point 1 above), but it’s a good practice.
How are media handled by the timeline tool? Can students upload their own media or must they link to media already on the Web?
Each of the timelines tools handles media (images, video, audio, etc.) a little differently. Some tools require you to link to media that is already on the Web, while others allow you to upload them from your computer or smartphone. There are some workarounds to situations when a student wants to link to something that doesn’t already exist on the web (such as uploading an image to a image hosting site like Flickr), but you will need to consider if the media is infringing on copyright laws. See the CFT blog post on Finding Non-Copyrighted Images for Presentations.
Deciding on a Timelines Tool or Platform
There are many different tools to choose from, some commercial others are open-source, including basic time-only tools like TimelineJS, Tiki-Toki, and Prezi, and tools that combine timelines with geospatial data like TimeMapper, Mapbox, Neatline, and American Panorama.
Regardless of the tool you use, you will want to consider:
- Learning Goals: What are your goals for using a digital timeline? Some tools are better at presenting entries linearly (useful for making an argument or telling a story with a timeline), others make categories and tags easy to see (useful for identifying themes and comparing across contexts), and others offer robust search tools (useful when a timeline needs to function as an annotated bibliography).
- Ease of Use: How much time will it take you to learn how to use the technology? How much time will it take your students to learn it? Do you need to have programming experience (like for Neatline) or is it designed for the novice user (like Tiki-Toki)?
- Student Access: Will your students be able to access the technology while in class? From home? From the library? Is it accessible for all students in your class, including those with low or no vision or have auditory or other cognitive disabilities?
- Maintenance: How easy is the timeline to maintain and upgrade?
- Sustainability: How long will this tool be around? For example, although Tiki-Toki is easy to use, you’re at the mercy of a third party for keeping your timeline up and running during and after the semester. An open-source option like TimelineJS gives you more control, but it also requires more set-up. Also, is it important that the tool allow you to export content for archiving purposes?
- Costs: What is the cost of the technology? Some are free, while others use a subscription-based model. Additionally, some need to be installed on a personal or university server, which could be an out-of-pocket expense for the instructor.
- Interactivity and Collaboration: What kinds of interactivity (“liking” entries, comments and discussions associated with entries, and so on) does this technology enable? Between student and content? Between student and instructor? Between students? Between student and outside audience?
- Privacy: Does your plan for the technology allow students to protect their educational records or maintain certain levels of privacy? Would you be willing to let students use approved pseudonyms?
Outside the Box: Innovative Use of Timelines
- Use non-time elements: Who says that timelines need to be measured by time? What if you used page numbers in a novel to map a narrative? For example, Georgetown professor Sarah Stiles’ class created a timeline exploring a non-fiction book using Prezi.
- Create a big timeline. Assembling a timeline one entry at a time is fine, but what if we could use a bit of programming to import a large number of timeline entries from an existing database of some kind?
- Span the timeline over multiple semesters. If you teach a class more than once, you may choose to have students contribute to the same timeline over multiple semesters. This can help your students see many models of what to include and give them more data for final projects. You can also have students edit existing entries to include missing data, citations, and media elements — all lessons in editing they can use for formal assignments. For an example of a multi-semester approach to timelines, see “A Pedagogy That Spans Semesters” by Benjamin Wiggins, director of digital-learning initiatives and lecturer in history at the University of Pennsylvania.
- Use the timeline as a presentation. Use timelines to organize a lecture or have students use it as part of an in-class presentation.
- Create a timeline outlining a course’s content, readings, and assignments. Use a timeline to experiment with alternative ways to view the progression of a course’s structure. Plot descriptions of lectures, readings, and other course material on the dates they will be discussed or due in class.
Additional Resources
Bruff, D. (2016) “Timelines, EdTech, and Thin Slices of Student Learning.” Agile Learning blog. Retrieved from http://derekbruff.org/?p=3171.
Groeger, L. (2012). “Some Thoughts on Timelines.” The ProPublica Nerd Blog: Secrets for Data Journalists and Newsroom Developers. Retrieved from https://www.propublica.org/nerds/item/some-thoughts-on-timelines.

This teaching guide is licensed under a Creative Commons Attribution-NonCommercial 4.0 International License.